Tuesday, 3 June 2014

Describing Motion with Diagrams(1-D Kinematics)

Introduction to Diagrams


Throughout The Physics Classroom Tutorial, there is a persistent appeal to your ability to represent physical concepts in a visual manner. You will quickly notice that this effort to provide visual representation of physical concepts permeates much of the discussion in The Physics Classroom Tutorial. The world that we study in physics is a physical world - a world that we can see. And if we can see it, we certainly ought to visualize it. And if we seek to understand it, then that understanding ought to involve visual representations. So as you continue your pursuit of physics understanding, always be mindful of your ability (or lack of ability) to visually represent it. Monitor your study and learning habits, asking if your knowledge has become abstracted to a series of vocabulary words that have (at least in your own mind) no relation to the physical world which it seeks to describe. Your understanding of physics should be intimately tied to the physical world as demonstrated by your visual images. Like the study of all of physics, our study of 1-dimensional kinematics will be concerned with the multiple means by which the motion of objects can be represented. Such means include the use of words, the use of graphs, the use of numbers, the use of equations, and the use of diagrams. Lesson 2 focuses on the use of diagrams to describe motion. The two most commonly used types of diagrams used to describe the motion of objects are:
Begin cultivating your visualization skills early in the course. Spend some time on the rest of Lesson 2, seeking to connect the visuals and graphics with the words and the physical reality. And as you proceed through the remainder of the unit 1 lessons, continue to make these same connections.

Ticker Tape Diagrams


A common way of analyzing the motion of objects in physics labs is to perform a ticker tape analysis. A long tape is attached to a moving object and threaded through a device that places a tick upon the tape at regular intervals of time - say every 0.10 second. As the object moves, it drags the tape through the "ticker," thus leaving a trail of dots. The trail of dots provides a history of the object's motion and therefore a representation of the object's motion.
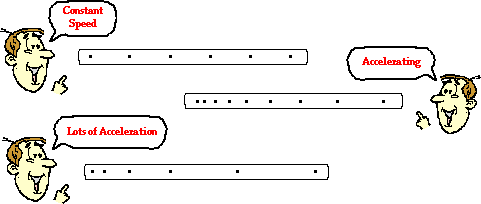
The distance between dots on a ticker tape represents the object's position change during that time interval. A large distance between dots indicates that the object was moving fast during that time interval. A small distance between dots means the object was moving slow during that time interval. Ticker tapes for a fast- and slow-moving object are depicted below.
The analysis of a ticker tape diagram will also reveal if the object is moving with a constant velocity or accelerating. A changing distance between dots indicates a changing velocity and thus an acceleration. A constant distance between dots represents a constant velocity and therefore no acceleration. Ticker tapes for objects moving with a constant velocity and with an accelerated motion are shown below.
And so ticker tape diagrams provide one more means of representing various features of the motion of objects.


Check Your Understanding

Ticker tape diagrams are sometimes referred to as oil drop diagrams. Imagine a car with a leaky engine that drips oil at a regular rate. As the car travels through town, it would leave a trace of oil on the street. That trace would reveal information about the motion of the car. Renatta Oyle owns such a car and it leaves a signature of Renatta's motion wherever she goes. Analyze the three traces of Renatta's ventures as shown below. Assume Renatta is traveling from left to right. Describe Renatta's motion characteristics during each section of the diagram.
1.


2.


3.

ANS:  Renatta moves with a constant speed in the first time interval. She then abruptly decelerates to a stop. She remains at rest for sometime and then moves with a constant speed, slower than the first speed.


Vector Diagrams


Vector diagrams are diagrams that depict the direction and relative magnitude of a vector quantity by a vector arrow. Vector diagrams can be used to describe the velocity of a moving object during its motion. For example, a vector diagram could be used to represent the motion of a car moving down the road.
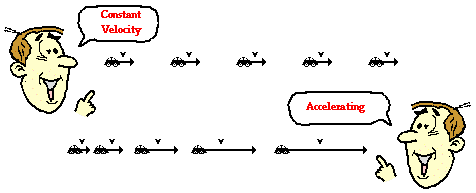
In a vector diagram, the magnitude of a vector quantity is represented by the size of the vector arrow. If the size of the arrow in each consecutive frame of the vector diagram is the same, then the magnitude of that vector is constant. The diagrams below depict the velocity of a car during its motion. In the top diagram, the size of the velocity vector is constant, so the diagram is depicting a motion of constant velocity. In the bottom diagram, the size of the velocity vector is increasing, so the diagram is depicting a motion with increasing velocity - i.e., an acceleration.
Vector diagrams can be used to represent any vector quantity. In future studies, vector diagrams will be used to represent a variety of physical quantities such as acceleration, force, and momentum. Be familiar with the concept of using a vector arrow to represent the direction and relative size of a quantity. It will become a very important representation of an object's motion as we proceed further in our studies of the physics of motion.


Describing Motion with Words(1-D Kinematics)

 Hi, this is saikrishna !!!!!!!!!!!

Thanks for visiting my website !!!!!!!!


 Introduction to the Language of Kinematics


A typical physics course concerns itself with a variety of broad topics. One such topic is mechanics - the study of the motion of objects. The first six units of The Physics Classroom tutorial will involve an investigation into the physics of motion. As we focus on the language, principles, and laws that describe and explain the motion of objects, your efforts should center on internalizing the meaning of the information. Avoid memorizing the information; and avoid abstracting the information from the physical world that it describes and explains. Rather, contemplate the information, thinking about its meaning and its applications.
Kinematics is the science of describing the motion of objects using words, diagrams, numbers, graphs, and equations. Kinematics is a branch of mechanics. The goal of any study of kinematics is to develop sophisticated mental models that serve to describe (and ultimately, explain) the motion of real-world objects.
In this lesson, we will investigate the words used to describe the motion of objects. That is, we will focus on the language of kinematics. The hope is to gain a comfortable foundation with the language that is used throughout the study of mechanics. We will study such terms as scalars, vectors, distance, displacement, speed, velocity and acceleration. These words are used with regularity to describe the motion of objects. Your goal should be to become very familiar with their meaning.


Scalars and Vectors


Physics is a mathematical science. The underlying concepts and principles have a mathematical basis. Throughout the course of our study of physics, we will encounter a variety of concepts that have a mathematical basis associated with them. While our emphasis will often be upon the conceptual nature of physics, we will give considerable and persistent attention to its mathematical aspect.
The motion of objects can be described by words. Even a person without a background in physics has a collection of words that can be used to describe moving objects. Words and phrases such as going fast, stopped, slowing down, speeding up, and turning provide a sufficient vocabulary for describing the motion of objects. In physics, we use these words and many more. We will be expanding upon this vocabulary list with words such as distance, displacement, speed, velocity, and acceleration. As we will soon see, these words are associated with mathematical quantities that have strict definitions. The mathematical quantities that are used to describe the motion of objects can be divided into two categories. The quantity is either a vector or a scalar. These two categories can be distinguished from one another by their distinct definitions:

  • Scalars are quantities that are fully described by a magnitude (or numerical value) alone.
  • Vectors are quantities that are fully described by both a magnitude and a direction.
The remainder of this lesson will focus on several examples of vector and scalar quantities (distance, displacement, speed, velocity, and acceleration). As you proceed through the lesson, give careful attention to the vector and scalar nature of each quantity. As we proceed through other units at The Physics Classroom Tutorial and become introduced to new mathematical quantities, the discussion will often begin by identifying the new quantity as being either a vector or a scalar.


Distance and Displacement


Distance and displacement are two quantities that may seem to mean the same thing yet have distinctly different definitions and meanings.
  • Distance is a scalar quantity that refers to "how much ground an object has covered" during its motion.
  • Displacement is a vector quantity that refers to "how far out of place an object is"; it is the object's overall change in position.
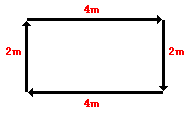
To test your understanding of this distinction, consider the motion depicted in the diagram below. A physics teacher walks 4 meters East, 2 meters South, 4 meters West, and finally 2 meters North.
Even though the physics teacher has walked a total distance of 12 meters, her displacement is 0 meters. During the course of her motion, she has "covered 12 meters of ground" (distance = 12 m). Yet when she is finished walking, she is not "out of place" - i.e., there is no displacement for her motion (displacement = 0 m). Displacement, being a vector quantity, must give attention to direction. The 4 meters east cancels the 4 meters west; and the 2 meters south cancels the 2 meters north. Vector quantities such as displacement are direction aware. Scalar quantities such as distance are ignorant of direction. In determining the overall distance traveled by the physics teachers, the various directions of motion can be ignored.
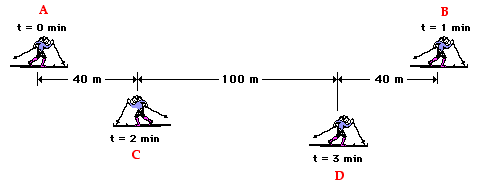
Now consider another example. The diagram below shows the position of a cross-country skier at various times. At each of the indicated times, the skier turns around and reverses the direction of travel. In other words, the skier moves from A to B to C to D.
 

Use the diagram to determine the resulting displacement and the distance traveled by the skier during these three minutes. Then click the button to see the answer.
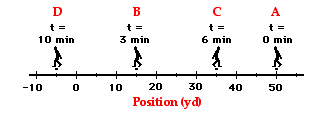
As a final example, consider a football coach pacing back and forth along the sidelines. The diagram below shows several of coach's positions at various times. At each marked position, the coach makes a "U-turn" and moves in the opposite direction. In other words, the coach moves from position A to B to C to D.
 
What is the coach's resulting displacement and distance of travel? Click the button to see the answer.
To understand the distinction between distance and displacement, you must know the definitions. You must also know that a vector quantity such as displacement is direction-aware and a scalar quantity such as distance is ignorant of direction. When an object changes its direction of motion, displacement takes this direction change into account; heading the opposite direction effectively begins to cancel whatever displacement there once was.
 

Check Your Understanding

1. What is the displacement of the cross-country team if they begin at the school, run 10 miles and finish back at the school?

2. What is the distance and the displacement of the race car drivers in the Indy 500?


ANSWERS:

1.The displacement of the runners is 0 miles. While they have covered a distance of 10 miles, they are not "out of place" or displaced. They finish where they started. Round-trip motions always have a displacement of 0.


2.The displacement of the cars is somewhere near 0 miles since they virtually finish where they started. Yet the successful cars have covered a distance of 500 miles.


Speed and Velocity


Just as distance and displacement have distinctly different meanings (despite their similarities), so do speed and velocity. Speed is a scalar quantity that refers to "how fast an object is moving." Speed can be thought of as the rate at which an object covers distance. A fast-moving object has a high speed and covers a relatively large distance in a short amount of time. Contrast this to a slow-moving object that has a low speed; it covers a relatively small amount of distance in the same amount of time. An object with no movement at all has a zero speed.
 

Velocity as a Vector Quantity

Velocity is a vector quantity that refers to "the rate at which an object changes its position." Imagine a person moving rapidly - one step forward and one step back - always returning to the original starting position. While this might result in a frenzy of activity, it would result in a zero velocity. Because the person always returns to the original position, the motion would never result in a change in position. Since velocity is defined as the rate at which the position changes, this motion results in zero velocity. If a person in motion wishes to maximize their velocity, then that person must make every effort to maximize the amount that they are displaced from their original position. Every step must go into moving that person further from where he or she started. For certain, the person should never change directions and begin to return to the starting position.
Velocity is a vector quantity. As such, velocity is direction aware. When evaluating the velocity of an object, one must keep track of direction. It would not be enough to say that an object has a velocity of 55 mi/hr. One must include direction information in order to fully describe the velocity of the object. For instance, you must describe an object's velocity as being 55 mi/hr, east. This is one of the essential differences between speed and velocity. Speed is a scalar quantity and does not keep track of direction; velocity is a vector quantity and is direction aware.
 

Determining the Direction of the Velocity Vector

The task of describing the direction of the velocity vector is easy. The direction of the velocity vector is simply the same as the direction that an object is moving. It would not matter whether the object is speeding up or slowing down. If an object is moving rightwards, then its velocity is described as being rightwards. If an object is moving downwards, then its velocity is described as being downwards. So an airplane moving towards the west with a speed of 300 mi/hr has a velocity of 300 mi/hr, west. Note that speed has no direction (it is a scalar) and the velocity at any instant is simply the speed value with a direction.


Calculating Average Speed and Average Velocity

As an object moves, it often undergoes changes in speed. For example, during an average trip to school, there are many changes in speed. Rather than the speed-o-meter maintaining a steady reading, the needle constantly moves up and down to reflect the stopping and starting and the accelerating and decelerating. One instant, the car may be moving at 50 mi/hr and another instant, it might be stopped (i.e., 0 mi/hr). Yet during the trip to school the person might average 32 mi/hr. The average speed during an entire motion can be thought of as the average of all speedometer readings. If the speedometer readings could be collected at 1-second intervals (or 0.1-second intervals or ... ) and then averaged together, the average speed could be determined. Now that would be a lot of work. And fortunately, there is a shortcut. Read on.

 
The average speed during the course of a motion is often computed using the following formula:
In contrast, the average velocity is often computed using this formula
Let's begin implementing our understanding of these formulas with the following problem:
Q: While on vacation, Lisa Carr traveled a total distance of 440 miles. Her trip took 8 hours. What was her average speed?
To compute her average speed, we simply divide the distance of travel by the time of travel.
That was easy! Lisa Carr averaged a speed of 55 miles per hour. She may not have been traveling at a constant speed of 55 mi/hr. She undoubtedly, was stopped at some instant in time (perhaps for a bathroom break or for lunch) and she probably was going 65 mi/hr at other instants in time. Yet, she averaged a speed of 55 miles per hour. The above formula represents a shortcut method of determining the average speed of an object.


Average Speed versus Instantaneous Speed

Since a moving object often changes its speed during its motion, it is common to distinguish between the average speed and the instantaneous speed. The distinction is as follows.
  • Instantaneous Speed - the speed at any given instant in time.
  • Average Speed - the average of all instantaneous speeds; found simply by a distance/time ratio.
You might think of the instantaneous speed as the speed that the speedometer reads at any given instant in time and the average speed as the average of all the speedometer readings during the course of the trip. Since the task of averaging speedometer readings would be quite complicated (and maybe even dangerous), the average speed is more commonly calculated as the distance/time ratio.
Moving objects don't always travel with erratic and changing speeds. Occasionally, an object will move at a steady rate with a constant speed. That is, the object will cover the same distance every regular interval of time. For instance, a cross-country runner might be running with a constant speed of 6 m/s in a straight line for several minutes. If her speed is constant, then the distance traveled every second is the same. The runner would cover a distance of 6 meters every second. If we could measure her position (distance from an arbitrary starting point) each second, then we would note that the position would be changing by 6 meters each second. This would be in stark contrast to an object that is changing its speed. An object with a changing speed would be moving a different distance each second. The data tables below depict objects with constant and changing speed.
Now let's consider the motion of that physics teacher again. The physics teacher walks 4 meters East, 2 meters South, 4 meters West, and finally 2 meters North. The entire motion lasted for 24 seconds. Determine the average speed and the average velocity.
The physics teacher walked a distance of 12 meters in 24 seconds; thus, her average speed was 0.50 m/s. However, since her displacement is 0 meters, her average velocity is 0 m/s. Remember that the displacement refers to the change in position and the velocity is based upon this position change. In this case of the teacher's motion, there is a position change of 0 meters and thus an average velocity of 0 m/s.
Here is another example similar to what was seen before in the discussion of distance and displacement. The diagram below shows the position of a cross-country skier at various times. At each of the indicated times, the skier turns around and reverses the direction of travel. In other words, the skier moves from A to B to C to D.
 

1.Use the diagram to determine the average speed and the average velocity of the skier during these three minutes. When finished, click the button to view the answer.
ANSWER:The skier has an average speed of
(420 m) / (3 min) = 140 m/min
and an average velocity of
(140 m, right) / (3 min) = 46.7 m/min, right
As a last example, consider a football coach pacing back and forth along the sidelines. The diagram below shows several of coach's positions at various times. At each marked position, the coach makes a "U-turn" and moves in the opposite direction. In other words, the coach moves from position A to B to C to D.
 
2.What is the coach's average speed and average velocity? When finished, click the button to view the answer.
ANSWER:Seymour has an average speed of
(95 yd) / (10 min) = 9.5 yd/min
and an average velocity of
(55 yd, left) / (10 min) = 5.5 yd/min, left
In conclusion, speed and velocity are kinematic quantities that have distinctly different definitions. Speed, being a scalar quantity, is the rate at which an object covers distance. The average speed is the distance (a scalar quantity) per time ratio. Speed is ignorant of direction. On the other hand, velocity is a vector quantity; it is direction-aware. Velocity is the rate at which the position changes. The average velocity is the displacement or position change (a vector quantity) per time ratio.

1-D Kinematics - Lesson 1 - Describing Motion with Words

Acceleration


The final mathematical quantity discussed in Lesson 1 is acceleration. An often confused quantity, acceleration has a meaning much different than the meaning associated with it by sports announcers and other individuals. The definition of acceleration is:
  • Acceleration is a vector quantity that is defined as the rate at which an object changes its velocity. An object is accelerating if it is changing its velocity.
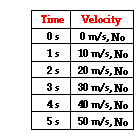
Sports announcers will occasionally say that a person is accelerating if he/she is moving fast. Yet acceleration has nothing to do with going fast. A person can be moving very fast and still not be accelerating. Acceleration has to do with changing how fast an object is moving. If an object is not changing its velocity, then the object is not accelerating. The data at the right are representative of a northward-moving accelerating object. The velocity is changing over the course of time. In fact, the velocity is changing by a constant amount - 10 m/s - in each second of time. Anytime an object's velocity is changing, the object is said to be accelerating; it has an acceleration.


The Meaning of Constant Acceleration

Sometimes an accelerating object will change its velocity by the same amount each second. As mentioned in the previous paragraph, the data table above show an object changing its velocity by 10 m/s in each consecutive second. This is referred to as a constant acceleration since the velocity is changing by a constant amount each second. An object with a constant acceleration should not be confused with an object with a constant velocity. Don't be fooled! If an object is changing its velocity -whether by a constant amount or a varying amount - then it is an accelerating object. And an object with a constant velocity is not accelerating. The data tables below depict motions of objects with a constant acceleration and a changing acceleration. Note that each object has a changing velocity.
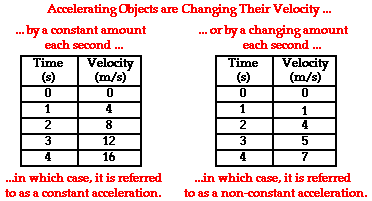
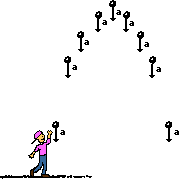
Since accelerating objects are constantly changing their velocity, one can say that the distance traveled/time is not a constant value. A falling object for instance usually accelerates as it falls. If we were to observe the motion of a free-falling object (free fall motion will be discussed in detail later), we would observe that the object averages a velocity of approximately 5 m/s in the first second, approximately 15 m/s in the second second, approximately 25 m/s in the third second, approximately 35 m/s in the fourth second, etc. Our free-falling object would be constantly accelerating. Given these average velocity values during each consecutive 1-second time interval, we could say that the object would fall 5 meters in the first second, 15 meters in the second second (for a total distance of 20 meters), 25 meters in the third second (for a total distance of 45 meters), 35 meters in the fourth second (for a total distance of 80 meters after four seconds). These numbers are summarized in the table below.
 
Time
Interval
Velocity Change
During Interval
Ave. Velocity
During Interval
Distance Traveled
During Interval
Total Distance Traveled from
0 s to End of Interval
0 – 1.0 s 0 to ~10 m/s ~5 m/s ~5 m ~5 m
1.0 – 2.0 s ~10 to 20 m/s ~15 m/s ~15 m ~20 m
2.0 – 3.0 s ~20 to 30 m/s ~25 m/s ~25 m ~45 m
3.0 – 4.0 s ~30 to 40 m/s ~35 m/s ~35 m ~80 m

Note: The ~ symbol as used here means approximately.
 

This discussion illustrates that a free-falling object that is accelerating at a constant rate will cover different distances in each consecutive second. Further analysis of the first and last columns of the data above reveal that there is a square relationship between the total distance traveled and the time of travel for an object starting from rest and moving with a constant acceleration. The total distance traveled is directly proportional to the square of the time. As such, if an object travels for twice the time, it will cover four times (2^2) the distance; the total distance traveled after two seconds is four times the total distance traveled after one second. If an object travels for three times the time, then it will cover nine times (3^2) the distance; the distance traveled after three seconds is nine times the distance traveled after one second. Finally, if an object travels for four times the time, then it will cover 16 times (4^2) the distance; the distance traveled after four seconds is 16 times the distance traveled after one second. For objects with a constant acceleration, the distance of travel is directly proportional to the square of the time of travel.
 

Calculating the Average Acceleration

The average acceleration (a) of any object over a given interval of time (t) can be calculated using the equation
This equation can be used to calculate the acceleration of the object whose motion is depicted by the velocity-time data table above. The velocity-time data in the table shows that the object has an acceleration of 10 m/s/s. The calculation is shown below.
Acceleration values are expressed in units of velocity/time. Typical acceleration units include the following:
m/s/s
mi/hr/s
km/hr/s
m/s2
These units may seem a little awkward to a beginning physics student. Yet they are very reasonable units when you begin to consider the definition and equation for acceleration. The reason for the units becomes obvious upon examination of the acceleration equation.
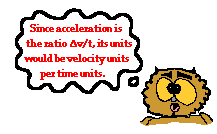
Since acceleration is a velocity change over a time, the units on acceleration are velocity units divided by time units - thus (m/s)/s or (mi/hr)/s. The (m/s)/s unit can be mathematically simplified to m/s2.
 

The Direction of the Acceleration Vector

Since acceleration is a vector quantity, it has a direction associated with it. The direction of the acceleration vector depends on two things:
  • whether the object is speeding up or slowing down
  • whether the object is moving in the + or - direction
The general principle for determining the acceleation is:
If an object is slowing down, then its acceleration is in the opposite direction of its motion.
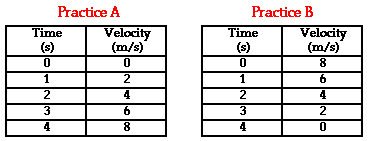
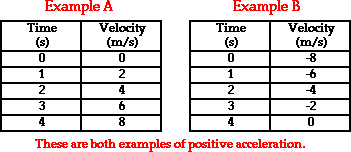
This general principle can be applied to determine whether the sign of the acceleration of an object is positive or negative, right or left, up or down, etc. Consider the two data tables below. In each case, the acceleration of the object is in the positive direction. In Example A, the object is moving in the positive direction (i.e., has a positive velocity) and is speeding up. When an object is speeding up, the acceleration is in the same direction as the velocity. Thus, this object has a positive acceleration. In Example B, the object is moving in the negative direction (i.e., has a negative velocity) and is slowing down. According to our general principle, when an object is slowing down, the acceleration is in the opposite direction as the velocity. Thus, this object also has a positive acceleration.
This same general principle can be applied to the motion of the objects represented in the two data tables below. In each case, the acceleration of the object is in the negative direction. In Example C, the object is moving in the positive direction (i.e., has a positive velocity) and is slowing down. According to our principle, when an object is slowing down, the acceleration is in the apposite direction as the velocity. Thus, this object has a negative acceleration. In Example D, the object is moving in the negative direction (i.e., has a negative velocity) and is speeding up. When an object is speeding up, the acceleration is in the same direction as the velocity. Thus, this object also has a negative acceleration.
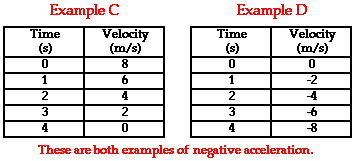

Observe the use of positive and negative as used in the discussion above (Examples A - D). In physics, the use of positive and negative always has a physical meaning. It is more than a mere mathematical symbol. As used here to describe the velocity and the acceleration of a moving object, positive and negative describe a direction. Both velocity and acceleration are vector quantities and a full description of the quantity demands the use of a directional adjective. North, south, east, west, right, left, up and down are all directional adjectives. Physics often borrows from mathematics and uses the + and - symbols as directional adjectives. Consistent with the mathematical convention used on number lines and graphs, positive often means to the right or up and negative often means to the left or down. So to say that an object has a negative acceleration as in Examples C and D is to simply say that its acceleration is to the left or down (or in whatever direction has been defined as negative). Negative accelerations do not refer acceleration values that are less than 0. An acceleration of -2 m/s/s is an acceleration with a magnitude of 2 m/s/s that is directed in the negative direction.

Check Your Understanding

To test your understanding of the concept of acceleration, consider the following problems and the corresponding solutions. Use the equation for acceleration to determine the acceleration for the following two motions.


Color and Vision(LIGHT BASED CHAPTER)

 This is saikrishna !!!!!!!!!!!!!!!
 thank you for visiting this website !!!!!!!!!
     

 Light Waves and Color - Lesson 2 - Color and Vision
   
The Electromagnetic and Visible Spectra:
As discussed in Unit 10 of The Physics Classroom Tutorial, electromagnetic waves are waves that are capable of traveling through a vacuum. Unlike mechanical waves that require a medium in order to transport their energy, electromagnetic waves are capable of transporting energy through the vacuum of outer space. Electromagnetic waves are produced by a vibrating electric charge and as such, they consist of both an electric and a magnetic component. The precise nature of such electromagnetic waves is not discussed in The Physics Classroom Tutorial. Nonetheless, there are a variety of statements that can be made about such waves.
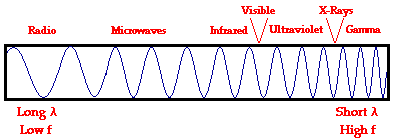
Electromagnetic waves exist with an enormous range of frequencies. This continuous range of frequencies is known as the electromagnetic spectrum. The entire range of the spectrum is often broken into specific regions. The subdividing of the entire spectrum into smaller spectra is done mostly on the basis of how each region of electromagnetic waves interacts with matter. The diagram below depicts the electromagnetic spectrum and its various regions. The longer wavelength, lower frequency regions are located on the far left of the spectrum and the shorter wavelength, higher frequency regions are on the far right. Two very narrow regions within the spectrum are the visible light region and the X-ray region. You are undoubtedly familiar with some of the other regions of the electromagnetic spectrum.


Visible Light Spectrum

The focus of Lesson 2 will be upon the visible light region - the very narrow band of wavelengths located to the right of the infrared region and to the left of the ultraviolet region. Though electromagnetic waves exist in a vast range of wavelengths, our eyes are sensitive to only a very narrow band. Since this narrow band of wavelengths is the means by which humans see, we refer to it as the visible light spectrum. Normally when we use the term "light," we are referring to a type of electromagnetic wave that stimulates the retina of our eyes. In this sense, we are referring to visible light, a small spectrum from the enormous range of frequencies of electromagnetic radiation. This visible light region consists of a spectrum of wavelengths that range from approximately 700 nanometers (abbreviated nm) to approximately 400 nm. Expressed in more familiar units, the range of wavelengths extends from 7 x 10⁻⁷ meter to 4 x 10⁻⁷ meter. This narrow band of visible light is affectionately known as ROYGBIV.
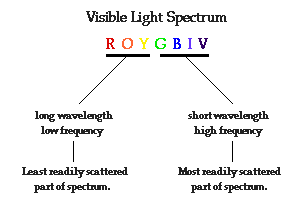
Each individual wavelength within the spectrum of visible light wavelengths is representative of a particular color. That is, when light of that particular wavelength strikes the retina of our eye, we perceive that specific color sensation. Isaac Newton showed that light shining through a prism will be separated into its different wavelengths and will thus show the various colors that visible light is comprised of. The separation of visible light into its different colors is known as dispersion. Each color is characteristic of a distinct wavelength; and different wavelengths of light waves will bend varying amounts upon passage through a prism. For these reasons, visible light is dispersed upon passage through a prism. Dispersion of visible light produces the colors red (R), orange (O), yellow (Y), green (G), blue (B), and violet (V). It is because of this that visible light is sometimes referred to as ROY G. BIV. (Incidentally, the indigo is not actually observed in the spectrum but is traditionally added to the list so that there is a vowel in Roy's last name.) The red wavelengths of light are the longer wavelengths and the violet wavelengths of light are the shorter wavelengths. Between red and violet, there is a continuous range or spectrum of wavelengths. The visible light spectrum is shown in the diagram below.

 
When all the wavelengths of the visible light spectrum strike your eye at the same time, white is perceived. The sensation of white is not the result of a single color of light. Rather, the sensation of white is the result of a mixture of two or more colors of light. Thus, visible light - the mix of ROYGBIV - is sometimes referred to as white light. Technically speaking, white is not a color at all - at least not in the sense that there is a light wave with a wavelength that is characteristic of white. Rather, white is the combination of all the colors of the visible light spectrum. If all the wavelengths of the visible light spectrum give the appearance of white, then none of the wavelengths would lead to the appearance of black. Once more, black is not actually a color. Technically speaking, black is merely the absence of the wavelengths of the visible light spectrum. So when you are in a room with no lights and everything around you appears black, it means that there are no wavelengths of visible light striking your eye as you sight at the surroundings.


Investigate!

The widget below matches the wavelength of light (in nanometers) to a particular color of light. Explore by entering various values between 400 nanometers and 700 nanometers. Values outside this range are not visible and therefore not associated with human-perceived color.

Match a Wavelength of Light to a Color

Enter the wavelength of a light wave (between 400 nm and 700 nm)
and then click on the Match to Color button.
Wavelength (nm)

Match to Color


Check Your Understanding

1. A light wave is an electromagnetic wave that has both an electric and magnetic component associated with it. Electromagnetic waves are often distinguished from mechanical waves. The distinction is based on the fact that electromagnetic waves ______.
a. can travel through materials and mechanical waves cannot
b. come in a range of frequencies and mechanical waves exist with only certain frequencies
c. can travel through a region void of matter and mechanical waves cannot
d. electromagnetic waves cannot transport energy and mechanical waves can transport energy
e. electromagnetic waves have an infinite speed and mechanical waves have a finite speed
 

2. Consider the electromagnetic spectrum as you answer these three questions.

a. Which region of the electromagnetic spectrum has the highest frequency?
b. Which region of the electromagnetic spectrum has the longest wavelength?
c. Which region of the electromagnetic spectrum will travel with the fastest speed?
3. Consider the visible light spectrum as you answer these two questions.
a. Which color of the visible light spectrum has the greatest frequency?
b. Which color of the visible light spectrum has the greatest wavelength?
ANSWERS:


1.Answer: C

Electromagnetic waves are able to travel through a vacuum - a region void of matter. Mechanical waves require a medium in order to propagate from one location to another.


2.a. The gamma radiation region have the highest frequency.

b. The radio wave region has the longest wavelength.

c. All regions have the same speed. The speed of a wave is not dependent upon its frequency and wavelength but rather upon the properties of the medium through which it travels.


3.a. Violet waves have the highest frequencies.
    
   b. Red waves have the longest wavelengths.


Visible Light and the Eye's Response

As mentioned in the first section of Lesson 2, our eyes are sensitive to a very narrow band of frequencies within the enormous range of frequencies of the electromagnetic spectrum. This narrow band of frequencies is referred to as the visible light spectrum. Visible light - that which is detectable by the human eye - consists of wavelengths ranging from approximately 780 nanometer (7.80 x 10⁻⁷ m) down to 390 nanometer (3.90 x 10⁻⁷ m). Specific wavelengths within the spectrum correspond to a specific color based upon how humans typically perceive light of that wavelength. The long wavelength end of the spectrum corresponds to light that is perceived by humans to be red and the short wavelength end of the spectrum corresponds to light that is perceived to be violet. Other colors within the spectrum include orange, yellow, green and blue. The graphic below depicts the approximate range of wavelengths that are associated with the various perceived colors within the spectrum.


Color Cones

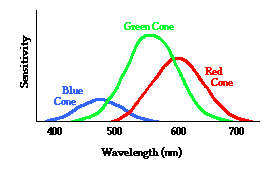
Color can be thought of as a psychological and physiological response to light waves of a specific frequency or set of frequencies impinging upon the eye. An understanding of the human response to color demands that one understand the biology of the eye. Light that enters the eye through the pupil ultimately strikes the inside surface of the eye known as the retina. The retina is lined with a variety of light sensing cells known as rods and cones. While the rods on the retina are sensitive to the intensity of light, they cannot distinguish between lights of different wavelengths. On the other hand, the cones are the color-sensing cells of the retina. When light of a given wavelength enters the eye and strikes the cones of the retina, a chemical reaction is activated that results in an electrical impulse being sent along nerves to the brain. It is believed that there are three kinds of cones, each sensitive to its own range of wavelengths within the visible light spectrum. These three kinds of cones are referred to as red cones, green cones, and blue cones because of their respective sensitivity to the wavelengths of light that are associated with red, green and blue. Since the red cone is sensitive to a range of wavelengths, it is not only activated by wavelengths of red light, but also (to a lesser extent) by wavelengths of orange light, yellow light and even green light. In the same manner, the green cone is most sensitive to wavelengths of light associated with the color green. Yet the green cone can also be activated by wavelengths of light associated with the colors yellow and blue. The graphic below is a sensitivity curve that depicts the range of wavelengths and the sensitivity level for the three kinds of cones.
The cone sensitivity curve shown above helps us to better understand our response to the light that is incident upon the retina. While the response is activated by the physics of light waves, the response itself is both physiological and psychological. Suppose that white light - i.e., light consisting of the full range of wavelengths within the visible light spectrum - is incident upon the retina. Upon striking the retina, the physiological occurs: photochemical reactions occur within the cones to produce electrical impulses that are sent along nerves to the brain. The cones respond to the incident light by sending a message forward to brain, saying, "Light is hitting me." Upon reaching the brain, the psychological occurs: the brain detects the electrical messages being sent by the cones and interprets the meaning of the messages. The brain responds by saying "it is white." For the case of white light entering the eye and striking the retina, each of the three kinds of cones would be activated into sending the electrical messages along to the brain. And the brain recognizes that the messages are being sent by all three cones and somehow interprets this to mean that white light has entered the eye.
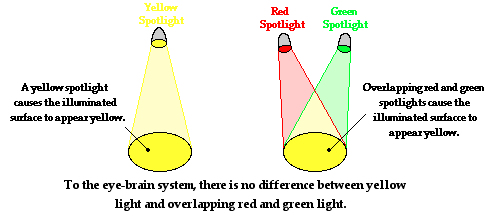
Now suppose that light in the yellow range of wavelengths (approximately 577 nm to 597 nm) enters the eye and strikes the retina. Light with these wavelengths would activate both the green and the red cones of the retina. Upon striking the retina, the physiological occurs: electrical messages are sent by both the red and the green cones to the brain. Once received by the brain, the psychological occurs: the brain recognizes that the light has activated both the red and the green cones and somehow interprets this to mean that the object is yellow. In this sense, the yellow appearance of objects is simply the result of yellow light from the object entering our eye and stimulating the red and the green cones simultaneously.
If the appearance of yellow is perceived of an object when it activates the red and the green cones simultaneously, then what appearance would result if two overlapping red and green spotlights entered our eye? Using the same three-cone theory, we could make some predictions of the result. Red light entering our eye would mostly activate the red color cone; and green light entering our eye would mostly activate the green color cone. Each cone would send their usual electrical messages to the brain. If the brain has been psychologically trained to interpret these two signals to mean "yellow", then the brain would perceive the overlapping red and green spotlights to appear as yellow. To the eye-brain system, there is no difference in the physiological and psychological response to yellow light and a mixing of red and green light. The brain has no means of distinguishing between the two physical situations.
 
In a technical sense, it is really not appropriate to refer to light as being colored. Light is simply a wave with a specific wavelength or a mixture of wavelengths; it has no color in and of itself. An object that is emitting or reflecting light to our eye appears to have a specific color as the result of the eye-brain response to the wavelength. So technically, there is really no such thing as yellow light. Rather, there is light with a wavelength of about 590 nm that appears yellow. And there is also light with a mixture of wavelengths of about 700 nm and 530 nm that together appears yellow. The yellow appearance of these two clearly different light sources can be traced to the physiological and psychological response of the eye-brain system, and not to the light itself. So to be technically appropriate, a person would refer to "yellow light" as "light that creates a yellow appearance." Yet, to maintain a larger collection of friendships, a person would refer to "yellow light" as "yellow light."
In the next several sections of Lesson 2, we will explore these concepts further by introducing three primary colors of light and generating some simple rules for predicting the color appearance of objects in terms of the three primary colors.
 

Investigate!

In this lesson we will spend a lot of time discussing three light colors - red, green, and blue. We will perceive light as consisting of red, green and blue qualities. Use the RGB widget below to determine the ratios by which red, green and blue light combine to form other light colors. Enter the name of a color (maize, purple, orange, sky blue, etc.) into the field. Then click the Submit button to find out its red, green, and blue components.

Light Absorption, Reflection, and Transmission

We have previously learned that visible light waves consist of a continuous range of wavelengths or frequencies. When a light wave with a single frequency strikes an object, a number of things could happen. The light wave could be absorbed by the object, in which case its energy is converted to heat. The light wave could be reflected by the object. And the light wave could be transmitted by the object. Rarely however does just a single frequency of light strike an object. While it does happen, it is more usual that visible light of many frequencies or even all frequencies is incident towards the surface of objects. When this occurs, objects have a tendency to selectively absorb, reflect or transmit light certain frequencies. That is, one object might reflect green light while absorbing all other frequencies of visible light. Another object might selectively transmit blue light while absorbing all other frequencies of visible light. The manner in which visible light interacts with an object is dependent upon the frequency of the light and the nature of the atoms of the object. In this section of Lesson 2 we will discuss how and why light of certain frequencies can be selectively absorbed, reflected or transmitted.


Visible Light Absorption

Atoms and molecules contain electrons. It is often useful to think of these electrons as being attached to the atoms by springs. The electrons and their attached springs have a tendency to vibrate at specific frequencies. Similar to a tuning fork or even a musical instrument, the electrons of atoms have a natural frequency at which they tend to vibrate. When a light wave with that same natural frequency impinges upon an atom, then the electrons of that atom will be set into vibrational motion. (This is merely another example of the resonance principle introduced in Unit 11 of The Physics Classroom Tutorial.) If a light wave of a given frequency strikes a material with electrons having the same vibrational frequencies, then those electrons will absorb the energy of the light wave and transform it into vibrational motion. During its vibration, the electrons interact with neighboring atoms in such a manner as to convert its vibrational energy into thermal energy. Subsequently, the light wave with that given frequency is absorbed by the object, never again to be released in the form of light. So the selective absorption of light by a particular material occurs because the selected frequency of the light wave matches the frequency at which electrons in the atoms of that material vibrate. Since different atoms and molecules have different natural frequencies of vibration, they will selectively absorb different frequencies of visible light.


Visible Light Reflection and Transmission

Reflection and transmission of light waves occur because the frequencies of the light waves do not match the natural frequencies of vibration of the objects. When light waves of these frequencies strike an object, the electrons in the atoms of the object begin vibrating. But instead of vibrating in resonance at a large amplitude, the electrons vibrate for brief periods of time with small amplitudes of vibration; then the energy is reemitted as a light wave. If the object is transparent, then the vibrations of the electrons are passed on to neighboring atoms through the bulk of the material and reemitted on the opposite side of the object. Such frequencies of light waves are said to be transmitted. If the object is opaque, then the vibrations of the electrons are not passed from atom to atom through the bulk of the material. Rather the electrons of atoms on the material's surface vibrate for short periods of time and then reemit the energy as a reflected light wave. Such frequencies of light are said to be reflected.


Where Does Color Come From?

The color of the objects that we see is largely due to the way those objects interact with light and ultimately reflect or transmit it to our eyes. The color of an object is not actually within the object itself. Rather, the color is in the light that shines upon it and is ultimately reflected or transmitted to our eyes. We know that the visible light spectrum consists of a range of frequencies, each of which corresponds to a specific color. When visible light strikes an object and a specific frequency becomes absorbed, that frequency of light will never make it to our eyes. Any visible light that strikes the object and becomes reflected or transmitted to our eyes will contribute to the color appearance of that object. So the color is not in the object itself, but in the light that strikes the object and ultimately reaches our eye. The only role that the object plays is that it might contain atoms capable of selectively absorbing one or more frequencies of the visible light that shine upon it. So if an object absorbs all of the frequencies of visible light except for the frequency associated with green light, then the object will appear green in the presence of ROYGBIV. And if an object absorbs all of the frequencies of visible light except for the frequency associated with blue light, then the object will appear blue in the presence of ROYGBIV.
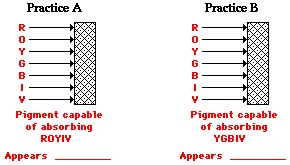
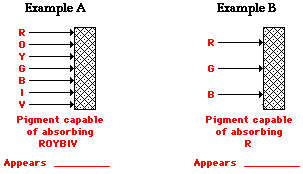
Consider the two diagrams below. The diagrams depict a sheet of paper being illuminated with white light (ROYGBIV). The papers are impregnated with a chemical capable of absorbing one or more of the colors of white light. Such chemicals that are capable of selectively absorbing one or more frequency of white light are known as pigments. In Example A, the pigment in the sheet of paper is capable of absorbing red, orange, yellow, blue, indigo and violet. In Example B, the pigment in the sheet of paper is capable of absorbing orange, yellow, green, blue, indigo and violet. In each case, whatever color is not absorbed is reflected.

1.Check your understanding of these principles by determining which color(s) of light are reflected by the paper and what color the paper will appear to an observer.

Transparent materials are materials that allow one or more of the frequencies of visible light to be transmitted through them; whatever color(s) is/are not transmitted by such objects, are typically absorbed by them. The appearance of a transparent object is dependent upon what color(s) of light is/are incident upon the object and what color(s) of light is/are transmitted through the object.

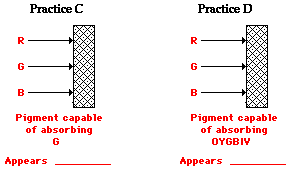
2.Express your understanding of this principle by filling in the blanks in the following diagrams.

The colors perceived of objects are the results of interactions between the various frequencies of visible light waves and the atoms of the materials that objects are made of. Many objects contain atoms capable of either selectively absorbing, reflecting or transmitting one or more frequencies of light. The frequencies of light that become transmitted or reflected to our eyes will contribute to the color that we perceive.


Check Your Understanding

1. Natural philosophers have long pondered the underlying reasons for color in nature. One common historical belief was that colored objects in nature produce small particles (perhaps light particles) that subsequently reach our eyes. Different objects produce different colored particles, thus contributing to their different appearance. Is this belief accurate or not? __________________ Justify your answer.

2. What color does a red shirt appear when the room lights are turned off and the room is entirely dark? ____________ What about a blue shirt? ____________ ... a green shirt? ____________

3. The diagrams depict a sheet of paper being illuminated with white light (ROYGBIV). The papers are impregnated with a chemical capable of absorbing one or more of the colors of white light. In each case, determine which color(s) of light are reflected by the paper and what color the paper will appear to an observer.


4. The appearance of a transparent object is dependent upon which color(s) of light is/are incident upon the object and which color(s) of light is/are transmitted through the object. Express your understanding of this principle by determining which color(s) of light will be transmitted and the color that the paper will appear to an observer.


Quiz answers:

1.Example A: Green will be reflected and so the paper appears green to an observer.
Example B: Red will be reflected and so the paper appears red to an observer.


CHECKING YOUR UNDERSTANDING ANSWERS:

1.Answer: Not accurate
This view presumes that the appearance of an object is independent of the colors of light which illuminate the object. We observe that the same object appears different colors when viewed under different light. So the secret to an object's appearance is not strictly due to its ability to produce a color. In fact the object's only role in determining its appearance is in its ability to absorb certain wavelengths of light which shine upon it.


2.
Answer: Black
When the room lights are turned off (there is no light), any object present in the room appears black. The color appearance of an object depends upon the light which that objects reflects to the observer's eye. Without any incident light, there can be no reflected light. Such an object appears black - the absence of light.
 

3.Practice A: No light will be reflected; it is all absorbed. Thus, the paper would appear black to an observer.
Practice B: Red and orange will be reflected and so the paper appears reddish-orange to an observer.


4. a)Practice A: Green and blue light will be transmitted and so         the object would appear greenish-blue to an observer.
Practice B: Red and orange light will be transmitted and so the object would appear reddish-orange to an observer.

b)Practice C: Red and blue light will be transmitted and so the object would appear reddish-blue to an      observer.
Practice D: Only red light will be transmitted and so the object would appear red to an observer.


Color Addition


Color perception, like sound perception, is a complex subject involving the disciplines of psychology, physiology, biology, chemistry and physics. When you look at an object and perceive a distinct color, you are not necessarily seeing a single frequency of light. Consider for instance that you are looking at a shirt and it appears purple to your eye. In such an instance, there may be several frequencies of light striking your eye with varying degrees of intensity. Yet your eye-brain system interprets the frequencies that strike your eye and the shirt is decoded by your brain as being purple.  

Primary Colors of Light

The subject of color perception can be simplified if we think in terms of primary colors of light. We have already learned that white is not a color at all, but rather the presence of all the frequencies of visible light. When we speak of white light, we are referring to ROYGBIV - the presence of the entire spectrum of visible light. But combining the range of frequencies in the visible light spectrum is not the only means of producing white light. White light can also be produced by combining only three distinct frequencies of light, provided that they are widely separated on the visible light spectrum. Any three colors (or frequencies) of light that produce white light when combined with the correct intensity are called primary colors of light. There are a variety of sets of primary colors. The most common set of primary colors is red (R), green (G) and blue (B). When red, green and blue light are mixed or added together with the proper intensity, white (W) light is obtained. This is often represented by the equation below:

R + G + B = W
In fact, the mixing together (or addition) of two or three of these three primary colors of light with varying degrees of intensity can produce a wide range of other colors. For this reason, many television sets and computer monitors produce the range of colors on the monitor by the use of red, green and blue light-emitting phosphors.


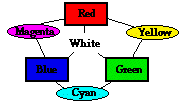
The addition of the primary colors of light can be demonstrated using a light box. The light box illuminates a screen with the three primary colors - red (R), green (G) and blue (B). The lights are often the shape of circles. The result of adding two primary colors of light is easily seen by viewing the overlap of the two or more circles of primary light. The different combinations of colors produced by red, green and blue are shown in the graphic below. (CAUTION: Because of the way that different monitors and different web browsers render the colors on the computer monitor, there may be slight variations from the intended colors.)


Color Addition Rules

These demonstrations with the color box illustrate that red light and green light add together to produce yellow (Y) light. Red light and blue light add together to produce magenta (M) light. Green light and blue light add together to produce cyan (C) light. And finally, red light and green light and blue light add together to produce white light. This is sometimes demonstrated by the following color equations and graphic:

R + G = Y
 
R + B = M
 
G + B = C

Yellow (Y), magenta (M) and cyan (C) are sometimes referred to as secondary colors of light since they can be produced by the addition of equal intensities of two primary colors of light. The addition of these three primary colors of light with varying degrees of intensity will result in the countless other colors that we are familiar (or unfamiliar) with.
 

Investigate!

On this page we've discussed adding red, green and blue light in equal intensities. What happens if they are added in unequal intensities? For instance, suppose you are on the stage lighting team for your school's theatre. Your task is to control the red, green and blue stage lights to produce various color effects for the upcoming show. Use the Color Addition widget below to adjust the strength of the red, green and blue lights relative to full strength. A 1.00 indcates that the light is on at full strength; a 0.00 means the light is off. (All numbers should range from 0.00 to 1.00.) Once adjusted, click the Mix 'Em Up button to find out the result of mixing red, green, and blue components at various strengths.

Color Addition

Enter relative values of the primary light colors.
Then click the Mix 'Em Up button to see the resulting color.
Red:
Green:
Blue

Mix 'Em Up


Complementary Colors of Light

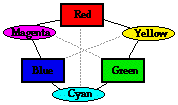
Any two colors of light that when mixed together in equal intensities produce white are said to be complementary colors of each other. The complementary color of red light is cyan light. This is reasonable since cyan light is equivalent to a combination of blue and green light; and blue and green light when added to red light will produce white light. Thus, red light and cyan light (which is equivalent to blue + green light) represent a pair of complementary colors of light; they add together to produce white light. This is illustrated in the equation below:


R + C = R + (B + G) = White
Each primary color of light has a secondary color of light as its complement. The three pairs of complementary colors are listed below. The graphic at the right is extremely helpful in identifying complementary colors. Complementary colors are always located directly across from each other on the graphic. Note that cyan is located across from red, magenta across from green, and yellow across from blue.

Complementary Colors of Light
 
Red and Cyan Green and Magenta
Blue and Yellow

The production of various colors of light by the mixing of the three primary colors of light is known as color addition. The color addition principles discussed on this page can be used to make predictions of the colors that would result when different colored lights are mixed. In the next part of Lesson 2, we will learn how to use the principles of color addition to determine why different objects look specific colors when illuminated with various colors of light.


Check Your Understanding

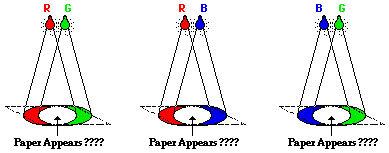
1. Two lights are arranged above a white sheet of paper. When the lights are turned on they illuminate the entire sheet of paper (as seen in the diagram below). Each light bulb emits a primary color of light - red (R), green (G), and blue (B). Depending on which primary color of light is used, the paper will appear a different color. Express your understanding of color addition by determining the color that the sheet of paper will appear in the diagrams below.


2. Suppose that light from a magenta spotlight and light from a yellow spotlight are mixed together, will white light be produced? Explain.


 ANSWERS:

1.R + G ---> Yellow
R + B ---> Magenta
B + G ---> Cyan

2.Answer: No 
The magenta spotlight can be thought of as a combination of red and blue light in equal intensities and the yellow spotlight is equivalent to a combination of red and green light in equal intensities. Observe the double abundance of red. Combining the light from the magenta and yellow spotlights will produce a whitish-red color - that is, pink.


Color Subtraction


The previous lesson focused on the principles of color addition. These principles govern the perceived color resulting from the mixing of different colors of light. Principles of color addition have important applications to color television, color computer monitors and on-stage lighting at the theaters. Each of these applications involves the mixing or addition of colors of light to produce a desired appearance. Our understanding of color perception would not be complete without an understanding of the principles of color subtraction. In this part of Lesson 2, we will learn how materials that have been permeated by specific pigments will selectively absorb specific frequencies of light in order to produce a desired appearance.
We have already learned that materials contain atoms that are capable of selectively absorbing one or more frequencies of light. Consider a shirt made of a material that is capable of absorbing blue light. Such a material will absorb blue light (if blue light shines upon it) and reflect the other frequencies of the visible spectrum. What appearance will such a shirt have if illuminated with white light and how can we account for its appearance? To answer this question (and any other similar question), we will rely on our understanding of the three primary colors of light (red, green and blue) and the three secondary colors of light (magenta, yellow and cyan).


The Process of Color Subtraction

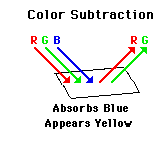
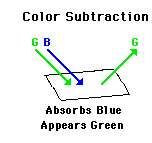
To begin, consider white light to consist of the three primary colors of light - red, green and blue. If white light is shining on a shirt, then red, green and blue light is shining on the shirt. If the shirt absorbs blue light, then only red and green light will be reflected from the shirt. So while red, green and blue light shine upon the shirt, only red and green light will reflect from it. Red and green light striking your eye always gives the appearance of yellow; for this reason, the shirt will appear yellow. This discussion illustrates the process of color subtraction. In this process, the ultimate color appearance of an object is determined by beginning with a single color or mixture of colors and identifying which color or colors of light are subtracted from the original set. The process is depicted visually by diagram at the right. Furthermore, the process is depicted in terms of an equation in the space below.

W - B = (R + G + B) - B = R + G = Y
Now suppose that cyan light is shining on the same shirt - a shirt made of a material that is capable of absorbing blue light. What appearance will such a shirt have if illuminated with cyan light and how can we account for its appearance? To answer this question, the process of color subtraction will be applied once more. In this situation, we begin with only blue and green primary colors of light (recall that cyan light consists of blue and green light). From this mixture, we must subtract blue light. After the subtractive process, only green light remains. Thus, the shirt will appear green in the presence of cyan light. Observe the representation of this by the diagram at the right and the equation below.

C - B = (G + B) - B = G
 
From these two examples, we can conclude that a shirt that looks yellow when white light shines upon it will look green when cyan light shines upon it. This confuses many students of physics, especially those who still believe that the color of a shirt is in the shirt itself. This is the misconception that was targeted earlier in Lesson 2 as we discussed how visible light interacts with matter to produce color. In that part of Lesson 2, it was emphasized that the color of an object does not reside in the object itself. Rather, the color is in the light that shines upon the object and that ultimately becomes reflected or transmitted to our eyes. Extending this conception of color to the above two scenarios, we would reason that the shirt appears yellow if there is some red and green light shining upon it. Yellow light is a combination of red and green light. A shirt appears yellow if it reflects red and green light to our eyes. In order to reflect red and green light, these two primary colors of light must be present in the incident light.

Test your understanding of these principles of color subtraction by determining the color appearance of the same shirts if illuminated with other colors of light. Be sure to begin by determining the primary color(s) of light that are incident upon the object and then subtracting the absorbed color from the incident color(s).

  ANSWER:

Practice A: Magenta light is a mixture of red light and blue light in equal intensities. Blue light must be subtracted since it is absorbed. When subtracting blue light from red and blue light, the red remains. The shirt appears red.
(R + B) - B = R
 
Practice B: Red light is a primary color. Blue light would have to be subtracted if present. Since it is not present, there is no need to worry about it. Red light is reflected and the shirt appears red.
 
Practice C: Blue light is a primary color. Blue light must be subtracted since it is absorbed. There is no other color left to reflect to our eyes. The shirt appears black since black is the absence of reflected light.


Complementary Colors and Color Subtraction

In the above examples, the paper absorbed blue light. Paper that absorbs blue light is permeated by a pigment known as a yellow pigment. While most pigments absorb more than a single frequency (and are known as compound pigments), it becomes convenient for our discussion to keep it simple by assuming that a yellow pigment absorbs a single frequency. A pigment that absorbs a single frequency is known as a pure pigment. The following rule will assist in understanding what colors of light are absorbed by which pigments.

Pigments absorb light. Pure pigments absorb a single frequency or color of light. The color of light absorbed by a pigment is merely the complementary color of that pigment.
Thus, pure blue pigments absorb yellow light (which can be thought of as a combination of red and green light). Pure yellow pigments absorb blue light. Pure green pigments absorb magenta light (which can be thought of as a combination of red and blue light). Pure magenta pigments absorb green light. Pure red pigments absorb cyan light (which can be thought of as a combination of blue and green light). And finally, pure cyan pigments absorb red light.
Now lets combine the process of color subtraction with an understanding of complementary colors to determine the color appearance of various sheets of paper when illuminated by various lights. We will investigate three examples.

Example 1

Magenta light shines on a sheet of paper containing a yellow pigment. Determine the appearance of the paper.
Magenta light can be thought of as consisting of red light and blue light. A yellow pigment is capable of absorbing blue light. Thus, blue is subtracted from the light that shines on the paper. This leaves red light. If the paper reflects the red light, then the paper will look red.

M - B = (R + B) - B = R


Example 2

Yellow light shines on a sheet of paper containing a red pigment. Determine the appearance of the paper.
Yellow light can be thought of as consisting of red light and green light. A red pigment is capable of absorbing cyan light. That is, red paper can absorb both green and blue primary colors of light (recall that cyan light is a mixture of green and blue light). So red and green light shine on the paper; and green light is subtracted. (There is no need to subtract blue light since blue light is not shining on the paper.) This leaves red light to be reflected. If the paper reflects the red light, then the paper will look red.
Y - G = (R + G) - G = R
   

Example 3

Yellow light shines on a sheet of paper containing a blue pigment. Determine the appearance of the paper.
Yellow light can be thought of as consisting of red light and green light. A blue pigment is capable of absorbing yellow light. That is, blue paper can absorb both red and green primary colors of light (recall that yellow light is a mixture of red and green light). So red and green light shine on the paper; and both the red and the green light are subtracted. There is no color left to be reflected to the eye. Subsequently, the paper appears black.
Y - Y = (R + G) - (R + G) = No reflected light = Black


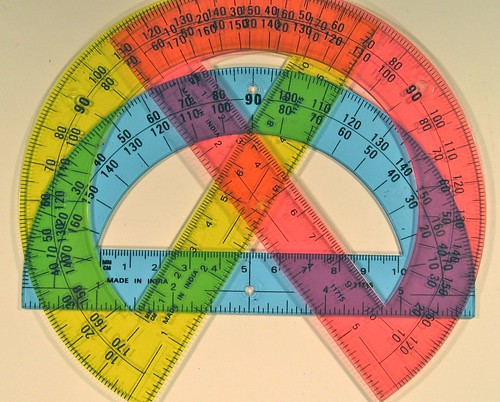
Flickr Physics Photo

Three transparent protractors are overlaid on top of each other. The protractors are colored cyan, magenta, and yellow. The three protractors are illuminated with white light, sometimes referred to as RGB light. Each protractor absorbs a single primary color of light. The cyan protractor absorbs red light. The magenta protractor absorbs green light. The yellow protractor absorbs blue light. Where two protractors overlap, a single primary color of light shows through. For example, where the cyan and the yellow protractor overlap, the red and blue light are absorbed and the green light is seem shining through. And where the cyan and the magenta protractor overlap, the red and green light are absorbed and the blue light is seem shining through. Finally, where the magenta and the yellow protractor overlap, the green and blue light are absorbed and the red light is seem shining through. This photo illustrates the principles of color subtraction.

CMY Subtraction


Filters and Color Subtraction

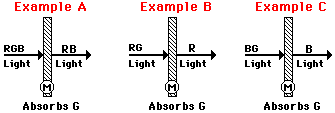
The above discussion applies to the appearance of opaque materials. The distinction between opaque and transparent materials was made earlier in this lesson. Opaque materials selectively absorb one or more frequencies of light and reflect what is not absorbed. In contrast to opaque materials, transparent materials selectively absorb one or more frequencies of light and transmit what is not absorbed. Like opaque materials, transparent materials are permeated by pigments that contain atoms that are capable of absorbing light with a single frequency or even a range of frequencies. Knowing the color(s) of the incident light and the color of light absorbed by the pigment or filter, the process of color subtraction can be applied to determine the color appearance of a transparent material. We will consider three examples in the space below; the examples are visually depicted in the diagrams below.
In Example A, white light (i.e., a mixture of red, green and blue) shines upon a magenta filter. Magenta absorbs its complementary color - green. Thus, green is subtracted from white light. That leaves red and blue light to be transmitted by the filter. For this reason, the filter will appear magenta (recall that magenta light is a mixture of red and blue light) when illuminated with white light. This process of color subtraction can be represented by the following equation.
W - G = (R + G + B) - G = R + B = M
In Example B, yellow light (i.e., a mixture of red and green) shines upon the same magenta filter. Magenta absorbs its complementary color - green. Thus, green is subtracted from yellow light. That leaves red light to be transmitted by the filter. For this reason, the filter will appear red when illuminated with yellow light. This process of color subtraction can be represented by the following equation.
Y - G = (R + G) - G = R
In Example C, cyan light (i.e., a mixture of blue and green) shines upon the same magenta filter. Magenta absorbs its complementary color - green. Thus, green is subtracted from cyan light. That leaves blue light to be transmitted by the filter. For this reason, the filter will appear blue when illuminated with cyan light. This process of color subtraction can be represented by the following equation.
C - G = (B + G) - G = B
 
The reasoning modeled in the above three examples can be used in any situation, regardless of the color of the incident light and the color of the filter. As you approach such problems, whether they involve transparent or opaque materials, be sure to think in terms of primary colors of light and to use the logical reasoning steps. Avoid memorizing and avoid shortcuts. If a filter is capable of absorbing a color of light that is not present in the mixture of incident light, then merely disregard that color. Since that color of light is not incident upon the object, it cannot contribute to the color appearance of the object.


Primary Colors of Paint

A trip to the local newspaper or film developing company will reveal these same principles of color subtraction at work. The three primary colors of paint used by an artist, color printer or film developer are cyan (C), magenta (M), and yellow (Y). Artists, printers, and film developers do not deal directly with light; rather, they must apply paints or dyes to a white sheet of paper. These paints and dyes must be capable of absorbing the appropriate components of white light in order to produce the desired affect. Most artists start with a white canvas and apply paints. These paints have to subtract colors so that you might see the desired image. An artist can create any color by using varying amounts of these three primary colors of paint.
Each primary color of paint absorbs one primary color of light. The color absorbed by a primary color of paint is the complementary color of that paint. The three colors that are primary to an artist (magenta, cyan, and yellow) subtract red, green, and blue individually from an otherwise white sheet of paper. Thus,
Magenta paints absorb green light.
Cyan paints absorb red light.
Yellow paints absorb blue light.
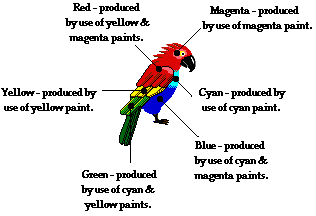
Let's suppose that an artist wishes to use the three primary colors of paint in order to produce a picture of the colorful bird shown at the right. The bird will be painted onto white paper and viewed under white light. It is hoped that the bird will have green tail feathers, a blue lower body, a cyan upper body, a red head, a magenta eye patch, a yellow eye and middle feathers, and a black beak. How can the three primary colors of paint be used to produce such a likeness? And how can we explain the answers in terms of color subtraction?
To produce a green tail, paints must be applied to the tail region in order to absorb red and blue light and leave green to be reflected. Thus, the green tail must be painted using yellow paint (to absorb the blue) and cyan paint (to absorb the red).
To produce a blue lower body, paints must be applied to the lower body region in order to absorb red and green light, leaving blue light to be reflected. Thus, the blue lower body must be painted using magenta paint (to absorb the green) and cyan paint (to absorb the red).
To produce a red head, paints must be applied to the head region in order to absorb blue and green light, leaving red light to be reflected. Thus, the red head must be painted using magenta paint (to absorb the green) and yellow paint (to absorb the blue).
To produce a cyan upper body, paints must be applied to the upper body region in order to absorb red, leaving green and blue light to be reflected. If green and blue light are reflected from the upper body region, it will appear cyan (recall that blue and green light combine to form cyan light). Thus, the cyan upper body must be painted using merely cyan paint (to absorb the red).
To produce a magenta eye patch, paints must be applied to the eye patch region in order to absorb green, leaving red and blue light to be reflected. If red and blue light is reflected from the eye patch region, it will appear magenta (recall that blue and red light combine to form magenta light). Thus, the magenta eye patch must be painted using merely magenta paint (to absorb the green).
To produce a yellow eye and middle feathers, paints must be applied to the eye and middle feather regions in order to absorb blue, leaving red and green light to be reflected. If red and green light is reflected from the eye and middle feather regions, it will appear yellow (recall that red and green light combine to form yellow light). Thus, the yellow eye and middle feathers must be painted using merely yellow paint (to absorb the blue).
This information is summarized in the graphic below.
 
The process of color subtraction is a useful means of predicting the ultimate color appearance of an object if the color of the incident light and the pigments are known. By using the complementary color scheme, the colors of light that will be absorbed by a given material can be determined. These colors are subtracted from the incident light colors (if present) and the colors of reflected light (or transmitted light) can be determined. Then the color appearance of the object can be predicted.


Investigate!

It's probably been a long time since you had a chance to play with those old Crayola crayons. It's time to get that box out now! What color do you get when you mix two crayons from the Crayola box? Use the Phun With Crayola Crayons widget to find out. Enter the names of two crayons from the box. (Examples: tan, forest green, yellow, mauve, brown, crimson, periwinkle, and more. Then click the Mix 'Em button to find out the result.


Blue Skies and Red Sunsets


The sun emits light waves with a range of frequencies. Some of these frequencies fall within the visible light spectrum and thus are detectable by the human eye. Since sunlight consists of light with the range of visible light frequencies, it appears white. This white light is incident towards Earth and illuminates both our outdoor world and the atmosphere that surrounds our planet. As discussed earlier in Lesson 2, the interaction of visible light with matter will often result in the absorption of specific frequencies of light. The frequencies of visible light that are not absorbed are either transmitted (by transparent materials) or reflected (by opaque materials). As we sight at various objects in our surroundings, the color that we perceive is dependent upon the color(s) of light that are reflected or transmitted by those objects to our eyes. So if we consider a green leaf on a tree, the atoms of the chlorophyll molecules in the leaf are absorbing most of the frequencies of visible light (except for green) and reflecting the green light to our eyes. The leaf thus appears green. And as we view the black asphalt street, the atoms of the asphalt are absorbing all the frequencies of visible light and no light is reflected to our eyes. The asphalt street thus appears black (the absence of color). In this manner, the interaction of sunlight with matter contributes to the color appearance of our surrounding world. In this part of Lesson 2, we will focus on the interaction of sunlight with atmospheric particles to produce blue skies and red sunsets. We will attempt to answer these two questions:

  • Why are the skies blue?
  • Why are the sunsets red?


Why are the skies blue?

The interaction of sunlight with matter can result in one of three wave behaviors: absorption, transmission, and reflection. The atmosphere is a gaseous sea that contains a variety of types of particles; the two most common types of matter present in the atmosphere are gaseous nitrogen and oxygen. These particles are most effective in scattering the higher frequency and shorter wavelength portions of the visible light spectrum. This scattering process involves the absorption of a light wave by an atom followed by reemission of a light wave in a variety of directions. The amount of multidirectional scattering that occurs is dependent upon the frequency of the light. (In fact, it varies according to f4.) Atmospheric nitrogen and oxygen scatter violet light most easily, followed by blue light, green light, etc. So as white light (ROYGBIV) from the sun passes through our atmosphere, the high frequencies (BIV) become scattered by atmospheric particles while the lower frequencies (ROY) are most likely to pass through the atmosphere without a significant alteration in their direction. This scattering of the higher frequencies of light illuminates the skies with light on the BIV end of the visible spectrum. Compared to blue light, violet light is most easily scattered by atmospheric particles. However, our eyes are more sensitive to light with blue frequencies. Thus, we view the skies as being blue in color.


Why are sunsets red?

Meanwhile, the light that is not scattered is able to pass through our atmosphere and reach our eyes in a rather non-interrupted path. The lower frequencies of sunlight (ROY) tend to reach our eyes as we sight directly at the sun during midday. While sunlight consists of the entire range of frequencies of visible light, not all frequencies are equally intense. In fact, sunlight tends to be most rich with yellow light frequencies. For these reasons, the sun appears yellow during midday due to the direct passage of dominant amounts of yellow frequencies through our atmosphere and to our eyes.


The appearance of the sun changes with the time of day. While it may be yellow during midday, it is often found to gradually turn color as it approaches sunset. This can be explained by light scattering. As the sun approaches the horizon line, sunlight must traverse a greater distance through our atmosphere; this is demonstrated in the diagram below.

 
As the path that sunlight takes through our atmosphere increases in length, ROYGBIV encounters more and more atmospheric particles. This results in the scattering of greater and greater amounts of yellow light. During sunset hours, the light passing through our atmosphere to our eyes tends to be most concentrated with red and orange frequencies of light. For this reason, the sunsets have a reddish-orange hue. The effect of a red sunset becomes more pronounced if the atmosphere contains more and more particles. The presence of sulfur aerosols (emitted as an industrial pollutant and by volcanic activity) in our atmosphere contributes to some magnificent sunsets (and some very serious environmental problems).


The Wonders of Physics


Photograph of Maui sunset by Becky Henderson